Friday, October 30, 2015

Fun-filled Fall Fermentation

I love the fall garden! The colors play well with the golds and reds in the woods. Add in the peppers, eggplant and even a few tomatoes still hanging in there and you've got a glorious rainbow of veggies. Carrots, beets, radishes, radicchio and broccoli with a background of kale and broccoli greens. Not pictured are Chinese cabbage, bok choy, brussels sprouts and all the salad greens.

Many tasty dishes can be made from this bounty, but all of these and many more can be fermented, as well. Fermentation has made my little heart race as of late.

Green beans and long beans fermenting.
Fermenting foods is an ages old method of preserving foods, from wine to sauerkraut, from kimchi to kombucha, from cucumber pickles to pickled eggs, from fermented fish to... the possibilities seem endless.

My first attempt at fermentation using salt and cabbage did not turn out well. We add the salt and pounded the cabbage, covered it and let it sit. However, we did not understand the necessity of having sufficient liquid to cover the fermenting vegetables. Rotted cabbage does not exude a pleasant smell, just so you know.

That was maybe nine years ago and I have not attempted brine fermentation since. A few years ago I discovered a method that uses whey extracted from plain yogurt. It uses less salt than the regular brine method and is, as far as I can tell, foolproof. But you must squeeze whey out of yogurt (the resulting thick yogurt "cheese" is quite yummy) and it contains some bit of whey protein that might cause a reaction in someone with a sensitivity to dairy.

But fermenting vegetables not only provides a different way of preserving vegetables, each small serving (use them as condiments, not as whole sides) contains billions of tiny microorganisms that will populate your gut. That's a good thing. These are some of the appropriate types of microorganisms for your gut. These many bacteria and what-have-you are necessary for proper digestion and absorption of nutrients. When we don't have enough of them, we suffer malnutrition. When the wrong kinds are most prevalent, we suffer from digestive issues, obesity, mental problems and numerous other problems that don't seem in any way connected to the digestive tract.

Make small batches in quart-size or two-quart-
size, wide-mouth canning jars. Use a half-
pint jar filled with water to weight the veggies
under the brine. Keep in mind that the jar will
sink a little and the jar might overflow.
If that doesn't convince you, fermented foods are plain delicious. Think beyond sauerkraut and cucumber pickles. Think kimchi, fermented green beans, pickled green tomatoes, pickled broccoli, cauliflower, brussels sprouts, hot and sweet peppers -- let your imagination run wild.

My fermentation adventures began with cucumbers. I had a few... thousand or so. I offered some to my neighbor who told me that she planned to ferment them. When I expressed interest, she loaned me her copy of "The Art of Fermentation," by Sandor Ellix Katz. This book is almost two inches thick, filled with not so much recipes but lots of information about all kinds of fermenting. Rather than starting my reading on page one, chapter one, I turned to the section on brine fermentation of cucumbers. He provided the ratio of salt to water (approximately 3 tablespoons canning salt per quart of water) and I jumped in.

While slicing cucumbers into my two-gallon crock I simply added fresh dill, garlic and other seasonings I usually use in making vinegar pickles. Then I poured the brine to cover, set a plate slightly smaller than the crock on top and weighted the plate with a glass jar of water. The whole thing was covered with a clean dish towel and set in the corner to ferment. Every couple of days or so you need to check the mess and skim off any scum or surface mold. (If it's white, you're ok, brightly colored molds mean start over and sterilize your container.) After a week, I considered them finished. But you can stop sooner or let it go longer. Taste the cukes and let your tastebuds be your guide as when to quit.

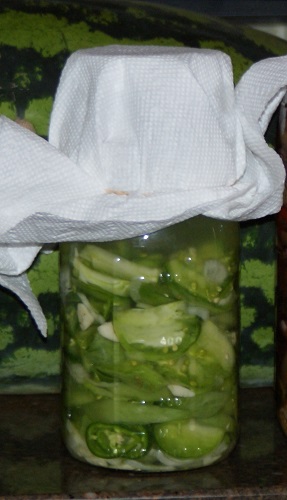
Cover the fermenting vegetables with a
paper towel or clean dish towel to keep
out dust, cat hair, errant mold spores, etc.
My next ferment was green beans and long beans. I tried both raw beans and cooked because my husband doesn't like the taste of raw beans. The taste test, however, indicated that the raw beans are just fine and that a 10-day ferment is better than a 7-day ferment.

Today I started green tomato pickles. Over the weekend I tasted a delectable green tomato pickle. The secret ingredient (shhhh, don't tell anyone) was a hint of smoked salt. This ingredient must be used sparingly, so I used just a couple of sprinkles. Before starting another batch, I'll test to see how that amount works.

Tomorrow -- Kimchi! A Korean style of fermented vegetables. That process is a little different than the above pickles, in which I simply poured brine over cut up and seasoned veggies. But I'll save that for another day. Every Korean family has its own kimchi recipe, so it seems that I have carte blanch to use whatever ingredients I desire. However, one traditional ingredient is Chinese or Napa cabbage, which I planted in order to kimchi.

Otherwise, just go crazy developing all kinds of vegetable mix and seasonings as you ferment. Not only will your tastebuds thank you, but your belly will be happier, too.


Monday, October 26, 2015

Pears to Perfection

We picked pears a month ago, or more. Because you pick pears before they are fully ripe, I assumed we had a good long while before I needed to "do something" with them. They sat in paper bags in the refrigerator, and every so often I would take one or two out to ripen so I could eat them.

But the gardens have produce blackberries and more blackberries, watermelon, cantaloup and even a few red raspberries. The new apple crop came into the stores and the price hit its annual low. And now we've found cheap pomegranates.

So eating pears has not been a priority.

A week or so ago I went through the bags of pears to make sure none of them needed to be used. Not only did I have to throw out a couple of rotten ones, but all of them were nearly perfectly ripe and ready. What am I going to do with all of those pears?

Not pear sauce/butter. I have several jars of pear sauce I canned two years ago. I am not a sauce-eating kind of gal. Well you can freeze pears, but our two small chest freezers, as well as the freezers in our two refrigerators are full. Full. And kale and other freezable greens are coming in fast. The smaller freezer is already full of fruit and the other has just enough space for freezing greens -- if we eat some of the other stuff already in there.

Jalapeno peppers can be dried, but I prefer to freeze them. Cayennes dry better.
The only option left is to dehydrate them. Fortunately, we've had just enough sunshine for the solar dehydrator to work well. All I had to do was cut, core and slice the pears (cutting out those hard "rocks" that form in them for whatever reason), and then lay them on the screens in the dehydrators. About two or two and a half days later they were dried to perfection, with no discoloration. People often believe that you have to put lemon juice or acetic acid or something on fruit to keep it from discoloring in the freezer or dehydrator, but no, you don't. And if they did brown just a little when dehydrating it doesn't hurt the flavor. The dehydrated pears are quite sweet and will make a wonderful winter treat.

Before I put the last of the pears in the dehydrator I made a small dish of baked pears. I simply sliced pears in a shallow glass baking dish -- make them only two or three layers deep -- and drizzled in  a bit of brandy (just enough to cover the bottom of the dish). I put small dabs of butter around the top of the pears -- not too much -- and sprinkled on garam masala, an Indian seasoning that contains, among many other things, nutmeg and cinnamon. Bake at 350 degrees for about an hour. OMG!

Tomatoes are about my favorite -- although not the easiest -- thing to dehydrate. When I planted my Amish Paste Tomatoes this spring, I did so knowing that most of them would be turned into tasty sun-dried tomatoes. They are tricky because they are so juicy. I've had to throw out a few batches of moldy ones. Long, sunny days are required to prevent mold. It seems that the way to turn a forecast of "sunny" into a "mostly cloudy" is for me to put tomatoes in the solar dehydrator. It happens with suspicious frequency.

My last successful batch of dried tomatoes was done when the days were shortening and not as hot, but I brought them in on the first night after a day outside and put them in my little electric dehydrator for a couple of hours, then put them back outside for another two days. Dried to perfection. I blanch the tomatoes in boiling water for one minute, which allows me to easily remove the skins. Then I slice or quarter them. Not too thin, or they'll melt into the dryer screen, and not too large or they will take too long to dry.

 Many things can be dehydrated successfully. I've done plums, summer squash and eggplant. All of my cayenne peppers get dehydrated. Green beans are a common thing to dehydrate, although I don't dry them. This past weekend I told someone that I had kale and other greens coming in from the garden and no space in the freezer. She suggested that I dry the kale and just throw it into soups. That didn't sound terribly appealing, but I will make a test run. If it does well, I'll put dry kale in the pantry instead of the freezer. Most Web sites I visited in search of how to properly dry kale said to stick it in the dehydrator raw; only one said to blanch it first. All recommended also making kale "chips" by rubbing the leaves with oil and sprinkling with salt and other seasonings before dehydrating. We'll see how that goes. I will let you know.

Sunday, October 18, 2015

MORE on Garlic, But the Last

Freshly potted rosemary, NOT garlic. But it goes well in dishes with garlic.
A braid of garlic hanging by the kitchen window might look cool and rustic and deter any vampires prowling around, but it's not the best way to store your garlic.

Different types and varieties have different shelf lives, but all should be kept in a cool, dark place to prevent shriveling and sprouting, as well as being cured properly.

Dig your garlic when all but the top 5 or 6 leaves have died. Don't dig immediately after rain or when the soil is really wet, unless you have no choice. Garlic dug from dryish soil will store longer. Use a garden fork to loosen the soil around the garlic and then pull it free.

Cure garlic in a shady, open place for about three weeks. I cure mine on a wire shelf rack in the garage. Then cut the stem about an inch from the top of the bulb and place in net bags. Keep in a cool, dark place, but not in the refrigerator. If you want to braid your garlic, soft neck varieties work best. But keep the braids in your cool, dark storage, bringing out one at a time to "decorate" the kitchen, as long as you will use it all in a few weeks.

My neighbor told me he keeps his garlic on an enclosed porch where it doesn't freeze but stays pretty cool. A temperature no higher than 60 degrees gives better storage, but the cooler the better. But not in the refrigerator. (Did I say that already?) I plan to put mine in a cabinet in our attached, but unheated garage.

None of the garlics I've planted ever stored through the winter. They shriveled and/or turned brown by the end of December. I suspect that my storage area was too warm. The pantry where I kept the garlic is open to the kitchen and so stays as warm as the rest of the house. An unused room that you don't heat much could be a good choice.

I hate harvesting lots of lovely garlic bulbs and having to throw out a bunch of them in the middle of winter. You can prepare your garlic for long-term storage if you don't have the best of storage places or otherwise feel you can't use it all before its expiration date. Or if in mid-December you notice the cloves start to shrivel a little.

Chop garlic finely and dehydrate (start dryer at 140 degrees for 2 hours then turn down to 130 and dry until crispy). Store in air tight jars. You can grind it into powder when needed, if that's easier for you to use. Mix it with salt for garlic salt to put on popcorn.

The freezer can be your friend here, too. Blend garlic with olive oil and pack into small jars to freeze. It will stay soft enough to scrape out whatever amount you wish. Never store garlic, raw or cooked, in oil at room temperature as it may grow botulism bacteria and turn deadly. Always freeze it. Commercially canned garlic in oil is prepared under specific conditions and acidified, a process that cannot be repeated properly at home.

Alternately, garlic can be simply chopped and frozen, or frozen as whole, unpeeled cloves. Raw, peeled cloves can be submerged in wine (preferably a dry one, white or red) or vinegar and stored in the refrigerator for up to four months. The flavor permeates the liquid, which can be used as a seasoning.

Are you tired of reading about garlic yet? I think I've said all I want to say, although garlic has such a long history of cultivation and use that much more can be said. Look it up yourself, is what I say.

And notice, I didn't hardly mention vampires at all.

Friday, October 16, 2015

All This Variety

Not all garlic is created equal. First you have different "types" of garlic. Two main ones are soft neck and hard neck types, with the hard necks producing a hard flower stalk. Within those you have even more variation -- artichoke, rocambole, silverskin, porcelain, purple stripe, creole and turban, and maybe some others. Within those varieties are numerous cultivars, I won't even try to guess how many. I've grown at least a half dozen, probably more varieties myself and haven't even scratched the surface. Each type of garlic has different characteristics. Some types are easier to grow, more tolerant of specific conditions, different clove sizes and numbers, better flavor, longer storage, and so on. Cultivars vary a lot in flavor and pungency from complex flavors with little heat to simple flavor and blazing heat, with all variations in between.

I recommend trying different varieties to determine what works best for you and which flavors you prefer. You might like a complex, mild flavor for eating raw and a simpler flavor with lots of heat for its medicinal qualities. When planting, mark where each variety is, then keep each variety in separate net bags so you can identify, compare and assess them. Some have short shelf lives, so you'll want to use those first.

Following is information on the three varieties I will plant this fall.

Polish White, also called "New York White," has a "deep, rich flavor, with only a little bite" according to one source, and grows almost anywhere. It "keeps through the winter" or about six months and is considered early maturing. I'm not sure what "early" means in Kansas, but I often dig garlic anywhere from early June through July.

Polish White produces good size cloves and has fewer really small cloves in the center. That means it probably produces fewer cloves per head than the average artichoke type, but the larger size of cloves is a plus. According to one Web site, Polish White ranks 6-8 on the "garlickiness" scale and 3-4 on pungency. So it has lots of flavor (which one site called "rich, musky and earthy") but little heat, earning the adjective "mellow."

Polish White seems like a pretty standard garlic, good for people who like it, but can't take the heat. It works well in a wide variety of uses -- fresh, cooked, roasted -- and grows reliably.


Tochliavri. Use a pen or felt tip to mark each bulb so you know
which variety you are planting.
Red Toch (Tochliavri) was brought to the U.S. from a village in the Republic of Georgia called -- guess... OK, I'll tell you, Tochliavri. It also is the birthplace of the father of Chester Aaron, a well known garlic expert who has written several books on garlic and grows more than 30 varieties from 17 countries. I hadn't heard of him until I started researching information on Red Toch garlic. You learn something every day.

According the Seed Saver's Exchange catalogue the flavor of Red Toch is the "standard by which all other garlic flavor should be judged." It has a "complex yet delicate" or "rich but mellow" flavor (6-7 on the garlickiness scale, 1-2 on the pungency scale).

It adapts to many growing conditions and, although a soft neck variety, can produce a hard neck when stressed by heat. The heads contain 10 to 18 cloves and will keep for three to six months. Shorter keeping time may be a side effect of its milder flavor. It is good for use in cooking or raw.

Lorz Italian packs the most heat of the three varieties I have. While it ranks 4-5 on the garlickiness scale, its pungency ranks 8 (I presume on a 10-point scale). Adjectives used to describe its flavor include "bold" and "robust." Its bite supposedly increases with age (the garlic's age, not yours). One site noted that its flavor starts out mild and leaves a strong after taste. Its unique flavor earned it a spot in a program designed to preserve endangered heirlooms with unique characteristics.

Lorz provides 12-19 cloves per bulb with "not too many" small interior cloves that store for up to eight months, definitely a "keeper." One pound of this garlic can produce up to 10 pounds of new garlic.

Other garlic varieties I've grown in the past include Music -- a hard neck variety with really large cloves -- Silverwhite, Late Italian (or was it Early?), Metechi (which produced "giant cloves" according to my records), possibly Bogatyr (which I don't remember doing well), and probably a few others I can't remember. I think I grew Georgian Fire once, but I'm not sure. Maybe I just dreamed of growing it because I liked the name.

Pretty much every company that sells vegetable seeds also sells at least a couple of varieties of garlic. I've ordered garlic from Peaceful Valley Farm Supply, Seed Savers Exchange, Keene Organics, and Nichols Nursery, and probably from a couple of other places. Check out lots of places to compare varieties and prices.

Have fun garlic shopping.

Thursday, October 15, 2015

The Stinking Rose

This is not the "stinking rose" but a delightfully fragrant Souvenir de Mal Maison still in bloom in my garden.
A common name for garlic is "Stinking Rose." I presume the "rose" part comes from the look of the bulb with all its cloves. The "stinking" part is self explanatory, although I don't consider the garlic fragrance as a "stink." I believe that a restaurant somewhere in California goes by the name "Stinking Rose," and features numerous dishes redolent with garlic goodness.

Garlic is incredibly versatile and should be considered a vegetable rather than simply a seasoning. It possesses great nutritional value and is a valuable medicine. Raw garlic is considered a "prebiotic," a food that sets up favorable conditions for "good" bacteria in your gut that is so essential to proper digestion and health. Garlic also serves as an anti-microbial and and be used internally or topically to treat pathogens. It sulpherous compounds, which give it its smell, provide some of its microbe-fighting qualities. Garlic also gets kudos for benefitting the heart and circulatory system, as well as the respiratory system.

With all of its versatility and the fact that garlic grown by organic methods has more nutrition and medicinal quality than other garlic (due to the greater number of soil microbes in organically managed gardens) you would think I'd ALWAYS plant it.

However, last year I managed to go into winter without doing so. The crop planted the previous fall was small because I did not save much for seed from the previous year. Last year's small crop was eaten very quickly and left none to save for seed. I could not force myself to sit down and order seed garlic or any other fall-planted bulbs last fall. I missed not having my own garlic, so I made a point of getting seed garlic this year.

Fortunately, a neighbor who grows garlic to sell was at another neighbor's place during a recent farm tour, and had his garlic and other items for sale. So for $1 a bulb I got lovely locally grown garlic to plant (or eat, if I'd wanted. Maybe I should have gotten more.) While researching garlic yesterday I saw seed garlic selling for about $13 for just two bulbs. I've seen some organic seed garlic sold for as much as $25 a pound. The difference between seed garlic and what you buy to eat is that the seed garlic probably has some disease-free certification process to go through and it's definitely not irradiated, as much of the grocery store garlic is. However, if you can find locally grown garlic at the grocery store or farmers market, you certainly could try planting that.

The varieties my neighbor had for sale were Polish White, Tochliavri (aka Red Toch) and Lorz Italian. All are artichoke types, which are soft neck varieties with the potential to produce up to 20 cloves per bulb. The down side of that number of bulbs is that you frequently find numerous small cloves in the center of the many large cloves. Garlic comes in several types and the artichoke type is the favorite among commercial growers because it grows so easily and adapts to a variety of conditions.

Soft neck garlic can best be defined by what it is not, hard neck garlic, which produces a hard central flower stalk topped by the "flower" head, which in its immature, unopened stage is called a scape. Scapes can be used to flavor numerous dishes -- stir fry, pesto, pretty much anything you use garlic for. Soft neck varieties tend to keep longer than hard neck varieties, but the hard necks typically produce much larger cloves with fewer to each head.

When planting garlic (4-6 inches apart, more for larger bulbs), choose the larger cloves, which will produce larger heads. You can plant the small cloves closely together and in the spring use them as fresh garlic, or "cutting" garlic, snipping off the tops for use like chives.

Keep your garlic weed-free and water during extended dry periods. Foliar feeding with fish emulsion in April and May will help your garlic grow, although I've never done this. If scapes appear, cut them off, as they will reduce the bulb size by using energy that could go into bulb production. Use the scapes in any dish you would use garlic.

Next post I will cover the varieties I will plant this year.

Wednesday, October 14, 2015

Winding Down, Gearing Up and Garlic

This photo does not in any way capture the true glory of the orange and yellow nasturtiums growing here.
Summer's faded gown lies somewhat tattered across the landscape as Autumn arrives in full glory.
The summer vegetables decline, their production slowing as the sunlight hours wane. My energy also wanes a bit. I find it more difficult to get out of bed and half the morning is gone before I wander into the garden.

Yet the fall vegetables build up steam in the cooler air. Napa Cabbage and bok choy look gloriously robust. Lettuce, radishes, daikons, broccoli, cabbage seem to grow inches a day. It's time to top the brussels sprouts to encourage development of the "sprouts" in another month. Go ahead and harvest some of the large meaty leaves, they are tasty, nutritious additions to any meal.

The nasturtium plants, looking like small shrubs, are studded with brilliant, spicy blossoms. Outrageously beautiful and a welcome addition to our daily salads or as garnish for any meal. I will mourn their passing, but will valiantly try to extend their time by covering them during our first frosts.

The above photo shows only part of the fabulous show of nasturtiums, and is clear evidence of the beauty of serendipity. While I did indeed plant the nasturtiums in that bed, this does not look like my initial vision. The trellis rising above the nasturtiums was supposed to be covered with butternut squash vines. Another short arching trellis to the back was supposed to be covered with cucumbers. The cucumber plant is there, but hidden by the glorious growth of red malabar that planted itself there from seed from a plant I put there last year. The horta (a celosia with edible leaves) also came from seed dropped last year and the red amaranth lying on the ground toward the front showed up on its own, as well. Notice the morning glory weaving its way up the trellis and among the nasturtiums.

Serendipity.

The biggest and best watermelon I harvested this year also was a rogue, growing from seed left last year. Serendipity. My gardens are full of plants that planted themselves and require nothing from me but that I don't discourage their growth.

Among all of this activity of waning and waxing I am gearing up to plant garlic. Typically I would have the cloves in the ground by now, but I decided to wait for the moon this year. On Oct. 25 and 26 the moon will be in its second quarter and in the astrological sign of Aries, a good time for planting garlic, which has an affinity for the dry, fiery signs of Sagittarius, Aries and Leo and is best planted in the second or third quarter. I don't always follow the moon on this, but garlic can be planted well into November here, so I'm in no hurry.

The broadfork has already loosened the soil in the garlic bed, after I laid a layer of compost. If we still don't see rain (please, please do!) I will water the bed well the day before I plant.

A company from which I ordered seed garlic a few years ago sent me information on planting and care, as well as instructions on a pretreatment that gives the garlic a nutritional boost and helps curb diseases.

Break the cloves apart (don't remove papery skin) and soak in a solution of 1 Tablespoon fish emulsion and 2 Tablespoons baking soda to 1 gallon of water. I won't need more than a quart for the six bulbs (aka "heads," the conglomerate of cloves) that I will plant. Soak the cloves for 1 hour or more, then soak in vodka for 10 minutes. Plant.

Place cloves 1 to 2 inches deep and 4 to 6 inches apart in rows 12 to 18 inches apart. Since my raised beds are 3 to 4 feet wide, I simply plant cloves all 6 inches or more apart. Sometimes digging a trench makes planting go quicker, but I find digging individual holes easier. Water in and cover with a layer of straw or hay. The colder your winter, the deeper the mulch should be.

I often see green shoots sprouting from the garlic before winter sets in full force. If they winter kill, that is no problem.

To avoid dragging this post out too long, I will save information on the varieties I am planting for another post. Happy October!

Friday, October 9, 2015

Anticipation...

Fruit of the Osage Orange waiting to fall and litter my shade garden underneath.
Hedge balls have fallen fast and thick over the last few weeks. While I'm out in the garden, I occasionally hear a tiny snap, a rattling of leaves and a gentle thud as another hedge ball, aka hedge apple, falls to the ground. These large, wrinkled fruits grow on the hedge tree, officially known as the Osage orange.

These unique celosias will be cut down by Jack Frost's first visit.
The hedge apples are pleasantly fragrant and sometimes used to repel insects. They are hard and somewhat heavy, and it would be unpleasant to be standing in the wrong spot when one falls. Mostly, however, they are a minor nuisance, creating "trash" that I am compelled to clean up. They are inedible except for their well-hidden seeds. But who wants to tear up a hedge apple just for a few small seeds? I will leave them to the squirrels who delight in shredding the fruits.

As the hedge apples fall, I am watching the forecast for potential frosty nights.We've had a few nights when lows  hit the low 40s. (BRR!), but so far, the forecast doesn't get close to freezing for at least the next week. However, our average first frost date is mid-October, so I am planning for Jack Frost's visit.

As soon as the low temperature forecasts begin to fall near frost levels I will drag the old blankets and sheets out of the attic to throw over susceptible plants. Typically, the weather remains fairly mild after the first frosty night and we might not see another frost for a week or two or more. So protecting vulnerable veggies for a night or two can mean they will continue for a while afterward. Smaller, single plants can be protected by large buckets.

My task now has been to wander the garden and decide just what will be worth protecting.

The cool-season veggies can typically withstand a light freeze unprotected. However, summer plants -- tomatoes, peppers, etc. are vulnerable.

Tomatoes? I've already taken out the Black Plum tomatoes, which have always succumbed to whatever disease much sooner than the other varieties. The vines had many beautiful green tomatoes on them, and I could not bear to simply compost them. So I devised a Green Tomato Chicken Curry that was superb. My husband keeps asking if we have more green tomatoes in the garden. I've also seen a recipe for fermented green tomatoes.

So when the forecast calls for tomato-killing temps, I will not only pick all of the red and partly red fruits, I will happily strip the vines of green tomatoes, as well, perhaps even freezing some for later green tomato dishes. The tomatoes are too large to easily cover, so I'll let Jack Frost take the.

The bell peppers are another story. They've not been as productive as usual, so I haven't frozen nearly enough to get us through the winter. Organic bell peppers that have reach full color (red, orange, yellow) are quite expensive and I've got only a few in the freezer. The are very precious. Fortunately, peppers that have started to color will fully ripen on the kitchen counter if the temps are going to fall so low that covering them is futile. Perhaps I'll also throw a blanket over the scalloped summer squash, depending on whether it still has little squashes on it at the time. They were planted late and have only just started producing and add a nice fresh flavor to stir fries.

And the nasturtiums. At least some of them will get covered. Right now they are large and lush with an abundance of brilliant blooms, to beautiful to sacrifice to Jack Frost. Each day I pick large bunches of nasturtium blossoms to top our salads. They create a beautiful dish and add a spicy-sweet pop. Different colors of blossom often differ slightly in flavor. I frequently pick a bloom and pop it in my mouth while I'm in the garden. If it hasn't been visited by bees, I get a lovely sweetness from the nectar.

Of all the summer vegetables that will go down when Jack Frost first visits, I think that I will miss the nasturtiums most. You don't find them in stores. Lunch will be much less colorful when they are gone. Perhaps I will write more about them later.

Monday, October 5, 2015

Renewal

New growth on the tropical milkweed.
The tropical milkweed that had been stripped bare by Monarch butterfly larvae have put on new growth.

The larvae have transformed into butterflies and flown to Mexico.

Nature never ceases to amaze me with its ability to renew and transform.

Even among the newly sprouted shoots and the amazing transformations, this is the season of decline. Summer flowers spend their last sparks of energy on blossoming and forming seed. Seed drops to the ground or blows on the wind, carried by fine silken parachutes.

Green fades from leaves the brown, droop and decay, sending the vital energy into roots for winter's sleep.

Summer's ending. And in that ending sleeps a beginning. Seeds mean new plants in spring. Strong roots mean new shoots in spring.

Sleepy trees drop their leaves and microorganisms begin their feast of decay, turning the detritus into rich, life-bearing soil.

No death. Only change. No end without a beginning, no beginning without an ending.

Always awesome, magical, mysterious, magical.