Wednesday, August 9, 2023

Cucumbers!


 Cucumbers, cucumbers, cucumbers.

This photo is the beginning stage of brine-fermented cucumber pickles. Onions, garlic, dill and black peppercorns. Oh, and cucumbers. For crispier pickles I added grape leaves, which provide tannin that helps crisp them. The final ingredient is time. I let them sit for about a week, but more or less time is fine. Whatever gives you the flavor you want.

To make brine, dissolve three tablespoons of salt (canning/pickling salt, not table salt which has anti-caking agents added) to one quart (four cups) of water. Weight a plate with a jar full of water so that everything stays submerged.

I grow Miniature White cucumbers, and have grown other small, white varieties. I think they are pretty and make beautiful pickles and cucumber salads. The Miniature Whites stay relatively small, even when mature. They get fat, but not long. They're dense and juicy, and remain sweet. They don't get bitter in hot weather, not when the plant becomes mature.

I do lots of things with cucumbers besides pickles. Cucumber salad has onion, dill, cider vinegar and olive oil. Or just chop them into salads. Raw cucumber slices can be dipped in hummus, baba ganoush or other dips. I make "chips" by slicing cucumbers very thinly, sprinkling on salt and pepper (or other seasonings, if desired), and then dehydrating until crunchy. Stored in an airtight container (canning jars are best) they remain crisp for a long time. Pull out the juicer and juice the cucumbers. Cold cucumber juice is quite refreshing after a hot sweaty day in the garden.

My favorite way to use cucumbers is gazpacho. Gazpacho is a cold soup made with raw, pureed vegetables. Most recipes use tomatoes, but I use only cucumbers. The recipe I use follows:

2 1/4 pounds of cucumbers

1 teaspoon ground ginger

3/4 teaspoon salt

1/4 cup olive oil

1/4 cup of your favorite balsamic vinegar (we like quince pomegranate flavored white balsamic)

2 tablespoons lemon juice (freshly squeezed is best, but bottled works fine)


Put all in a blender and blend until smooth. Chill well and enjoy. You will need to stir or shake it before serving, as the solids tend to float a bit.

We like to serve it in small wine glasses. For fun, pull out the spiralizer (what? you don't have a spiralizer? get one. They're fun.) and make cucumber "noodles" to put in a bowl of gazpacho. Float edible flowers on it as garnish. 


Saturday, June 3, 2023

Flittering Fluttering


No Monarch butterflies have visited my small stand of common milkweed, as far as I know. I've seen none supping at the flowers, and the leaves have not been chewed by their caterpillars.

But this crowd of Great Spangled Fritillaries have had a grand party at the fragrant flowers for the past several days. It is a joy seeing the fritillaries fritillarying about. While one source discussing the Great Spangleds says their flight pattern is in a near straight line, I usually see them dancing around each other in a small crowd.

It's no wonder that we have these lovely butterflies fluttering around, as their host plant (the plant which feeds their caterpillars) is viola. We have many wild violets growing here and there and everywhere. Their pretty purple, sometimes white, flowers are often scattered on our daily salads. Their eggs are little greenish balls, and their caterpillars are spikey. 

The Great Spangled is the most common of the many fritillary (Speyeria) species. I was quite enamored when I discovered that there is an Aphrodite Fritillary. They are very similar to the Great Spangleds, with only minor differences in appearance, one being the Great Spangleds are a bit larger. Violas also host their caterpillars. But these are probably Great Spangleds, although I can pretend they're Aphrodites.

Butterfly season in general is heating up. I've seen a few specimens of some different species. Earlier, in May I saw one or two tiger swallowtails and zebra swallowtails. Paw paw trees host the larvae of the zebras. I know of at least one wild paw paw tree in the woods, and there are the paw paws I've planted.

The most numerous butterfly at this moment is the Hackberry Emperor. Their markings are lovely, but the colors are rather dull. The impressive thing about the Hackberry Emperor is in its numbers. Hundreds and hundreds of them congregate, once they emerge from their chrysalises. Our driveway is covered in them. They like to gather anywhere they find dampness, which includes the pile of poop some critter recently left in the middle of the driveway. 

We find it humorous that they often hitch rides as we drive. At first it feels like a magical experience to step outside the door, or walk down the driveway and have clouds of butterflies rise up around me -- here I am, the Faerie Queen. After a bit it does become a little annoying. I try to relax and enjoy it, though, as the season lasts only a couple of weeks. 

The Gauntlet

However, hundreds gather outside our front and back doors, fluttering and swirling about whenever we emerge. We must exit and enter quickly, or find ourselves chasing them down indoors. No matter how hard we try, we always let a few in.

Their larvae feed on the leaves of hackberry trees (and a couple of relatives). A hackberry tree grows behind our sauna, and last month a number of the horned hackberry caterpillars attached themselves to the sauna wall in order to create a chrysalis and pupate. The top branches of that particular tree are bare of leaves. While the caterpillars are feeding, a gentle rain of caterpillar poop falls beneath the trees.

Lovely.


Tuesday, May 16, 2023

Who Needs Lettuce?


So, yeah. Lettuce. Who needs it?

For the past month or so I haven't... much, anyway.

My daily salads have overflowed my bowl, made largely with foraged greens. The salad pictured here does have a little lettuce in it, but on many days, I've used none.

The forage has included lambs quarters (lots), cleavers, chickweed, dandelion leaves, radicchio sprouting back from last fall's planting, violet leaves (young) and flowers, bronze fennel, second-year parsley, chives and/or garlic chives (especially chive flowers popping open now), sometimes herb leaves like monarda, mint and lemon balm, and even a little henbit. I've noticed some wood sorrel/sour grass/oxalis, so I'll start including that, too. Plus this has carrots (not homegrown... yet), freshly picked asparagus, arugula microgreens, apple, nuts of some kind, and I don't remember what else.

These salads not only are tastier than store-bought lettuce, but far more nutritious. However, the season is getting late. The cleavers already is too mature for salads, and the chickweed won't last much into the heat. The herbs will hang around and be available all summer, though.

Never fear, the earliest planted lettuce has now reached a nice size, so I'll include some of that in future salads. Also, the garden-grown arugula is ready to pick.

I love my salads!

Thursday, March 23, 2023

Rad Radicchio

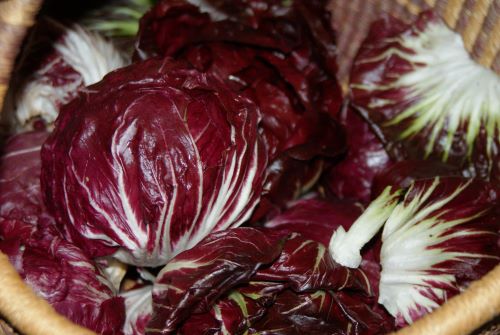
Rossa de Verona Radicchio

Last fall, while showing off my end-of-the-season harvest, I bragged about my lovely radicchio. Then a friend asked, "What is radicchio?"
Regardless of what this photo looks like, it is not a cabbage. In fact, it is much more closely related to sunflowers, lettuce and other members of the Aster family (Asteraceae). 
Radicchio is a form of chicory (Cichorium intybus), an inconspicuous roadside weed that suddenly becomes conspicuous in late summer when it sends up a stalk bearing bright blue flowers along it. Roasted chicory root can be brewed like tea, or even coffee, to make a lovely dark, rich coffee-like drink. Chicory has often been added to coffee, and is considered a caffeine-free coffee substitute. Although, while the flavor might be similar to coffee, don't expect it to taste just like coffee. 
Start with leeks and carrots.
Endive and escarole are other forms of chicory that you might find in the grocery store or at the farmers market. To grow radicchio, start transplants about six weeks before planting in the garden, or direct sow once danger of frost is past. I have had the best luck in getting my radicchio to head when I plant it as a fall crop, putting in transplants at about the same time as I plant my fall cabbages, as it heads best in cooler weather. When I've planted it in spring, I got no heads, but it did flower in late summer.
This isn't supposed to be a post about planting radicchio, however, but about using it as food. I had thought that one way to keep the blog posts coming during the winter was to switch to sort of a cooking blog -- just how do I use these veggies I grow? Well, it's late March and I've done one... you remember... the apple one?
So here goes.
Like chicory leaves and its relative the dandelion, radicchio is a bitter vegetable. Americans, as a rule do not eat enough bitters, which are good for your digestion. People once ate lots of bitters, recognizing their benefits in aiding digestion, especially of fats and meats. While most people aren't used to the flavor of bitter in their vegetables, one can grow to love it. I have.
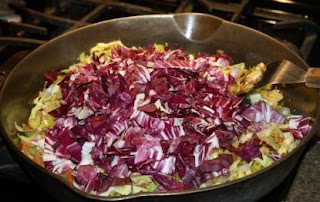
Add radicchio.
You certainly can buy bitter herbal tinctures, but those are best left to when a stronger medicine is needed. In general, using bitters (and other herbal things) as a daily food is better for encouraging health than using strong concoctions. Eat bitters, then, like dandelion greens and radicchio. Even lettuce can be a mild bitter, especially when left in the garden a little too long.
The way I use radicchio and other bitter greens most is in salad. A small amount of bitter greens mixed in with sweeter lettuces cuts the bitter flavor a lot. Dressing it with vinegar and oil also dampens the bitterness. You get the benefit of the bitterness (because you are still tasting it, even when you're not tasting it) and the crunch and color of the raw plant.
Another way to tone down the bitterness of radicchio is to cook it with a bit of oil. My first introduction to radicchio was as a plain, roasted vegetable served before the rest of the meal (which is when you should have your bitters). The bitterness was somewhat of a shock, but one that I later sought.
Last fall's radicchio was abundant enough that it lasted into December. It was more than I could use in salads, so I brought out the pots and pans, and grew quite attached to the concoction I made.
It's been a few months, so I will try to remember what I used. Fortunately, it was a pretty simple recipe. 
And I use the term "recipe" loosely. I can give you ingredients, but... What? Me measure? Leeks and carrots were harvested at the same time as the radicchio, so they were the other main ingredients.
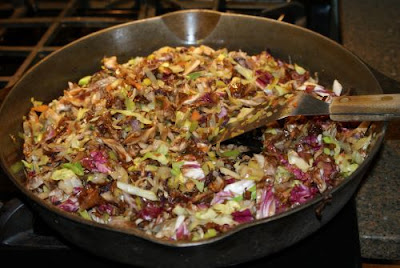
Done.


Radicchio and Leek Stir Fry
Leeks
Carrots
Radicchio
Fennel seed
Oil -- preferably avocado oil or extra virgin olive oil

Thinly slice carrots and leeks. Chop or shred radicchio. Pour oil into heavy skillet (I like cast iron for any kind of sauteeing) and start heating. Toss in a tablespoon or two of fennel seed -- I really like fennel seed, and it's also good for digestion. Add the carrots and cook for five minutes or so, stirring frequently. Add leeks and continue cooking. Leeks are drier than onions, so will burn more readily. Stir frequently. When the carrots and leeks are getting tender, add the radicchio and cook until all vegetables are done.
Serve with some chicken, or sweet potatoes, or potatoes. It might also be a good accompaniment to a game meat. I don't know. I haven't tried it. 

Now you know a little bit about radicchio and how to use it. I'm sure the online gang can provide a wealth of ways to use radicchio. One more tip about radicchio. It's expensive to buy. The last I looked, one head of organic radicchio was nearly $6. So if you want to try it, it's much cheaper to grow.
Get radical with radicchio.


Wednesday, March 8, 2023

Goings On


Look at this!

The sweet potatoes I set out a couple of weeks ago are producing sprouts! It's particularly exciting because this is the first time I've grown my own slips.

I've cut free five already and stuck them in soil to root. The first to produce sprouts were two of the all purple ones (top of image). A third all purple (lower center) is being pokey about sprouting, but I think I saw a tiny little sprout on it yesterday. 

The next to sprout was one of the Jerseys (lower right), a white variety that is very sweet. Its sprouts are not yet big enough to cut and root, but it's getting close. A second one (lower left) has tiny buds on it, and a third (in a different container) is being stubborn. Three of the six Japanese sweet potatoes (purple skin, white flesh) are just beginning to sprout.

These won't provide all of the sweet potato slips I want to plant. Soon I will order a few Murasaki (like the Japanese ones) and Bonita (white) from K-State through a local hardware store, and in May I'll buy all of my orange variety from a local nursery that gets in huge slips that are already rooted. We are going to be laden with sweet potatoes come fall.


I thought we'd have plenty of sweet potatoes from the 160 slips I planted last year, but we've had to start buying them. 

It's also time to start "hardening off" the baby cabbage and broccoli plants. In two to three weeks, depending on the weather forecast, they will go out into the garden soil. A two- to three-week hardening off period helps them adjust to the great outdoors. 

Tiny eggplants are reaching toward the lights, and bell pepper seeds are just beginning to germinate.

Bees visit the crocus blooms and purple rock iris outdoors, the winter aconite is beginning to fade, and little green shoots are popping up all over.

I've already planted some snap peas and lettuce, and will plant more next week. It's an exciting time of
anticipation. The rosemary plants have been moved from the "plant room" onto the front porch, and the fig and Kentucky coffee tree seedling have been moved from the garage to the porch. 

Lastly, indoors, the walking iris has finally bloomed. Last year it bloomed in late January. I'm not sure why it's so late this year. It probably needs to be divided into two or three pots. It doesn't look crowded, but maybe the plants feel crowded. 

Can't wait to see what's next.

Monday, February 6, 2023

Sticks


This looks like a bunch of sticks stuck in pots of soil.

And that's exactly what it is.

But they aren't just any old sticks. They are cuttings from two hazelnut (filbert) trees that I hope will develop roots and eventually become nut-producing trees.

The two original trees were planted below the dam at the bottom of our hill. However, they were planted too far apart to pollinate each other properly, so no nuts. I found two nuts on one of the trees one year, but otherwise, none. 

That could be because hazelnuts fall to the ground when they're ripe. The trees are surrounded by tall grass, so even if they produced nuts, unless I happened to see them on the trees (not real likely because I don't visit them often) there isn't any way I would have known nuts were produced. Plus, squirrels and other critters would have scavenged them before I could get to them. 

So I'm going to try rooting these cuttings and growing the trees/large shrubs in the cultivated areas around our house. I took some cuttings last year, but in late March, I think. No luck with those, so I'm trying again. I covered the cuttings with a plastic bag to maintain humidity and left them in our attached garage to acclimate more slowly to a warmer environment. In a few days I'll move them indoors.

After reading a couple of things on rooting cuttings from woody plants, I might shove these a little deeper into the soil, and make up some homemade rooting solution to pour onto the soil in a few days. Rather than buying a rooting hormone I can place one-inch pieces of fresh willow growth in a jar and pour boiling water over them and let them soak in a sunny spot for 24 hours. Pour that into the soil. 

You also can use honey as a rooting solution: 1 tablespoon honey in 2 cups of boiling water. Stir well and let cool. Pour into the soil around your cuttings within two weeks.

Or, apple cider vinegar and cinnamon. Before sticking the cuttings into soil, dip the ends into a solution of 3 teaspoons (1 tablespoon) of cider vinegar in one gallon of water, then dip into ground cinnamon and poke into the soil.

I cannot vouch for these methods, but I do know that fresh cuttings from the ends of willow branches contain root-stimulating properties. I will probably try the honey solution, because the willows are still dormant and I've already put my sticks -- excuse me -- cuttings in soil.

I am hopeful. A year ago this past fall I took cuttings from the fig trees my husband was preparing to dig out. I think I took a dozen cuttings and one took hold, even though it was the wrong time of year to do it. That same year, but in the early spring, I took a cutting or two of the elderberries when I pruned them and just stuck them in the ground. They took root and grew leaves. 

So I'm hopeful. I guess that's what my gardening adventures are all about... Hope.

Before I go, here is a link to a Web site with instructions on how to propagate trees from hardwood cuttings. It doesn't mention hazels, but still, I'm hopeful.

Tuesday, January 31, 2023

Sweet, Sweet Potato Slips


Flowers of the sweet potato vine. Yes, they do look like morning glories. The two are closely related. Both are species of Ipomea. However, morning glories are somewhat toxic, and every bit of the sweet potato plant is edible.

Get ready, set, 

Start! Sprouting, that is.

Last week I put my "seed" sweet potatoes in a paper bag and set them in a warm spot for the "pre-sprouting" process. About the middle of February I'll pull them out of the bag and put them in soil. You can lay them in flats or place them vertically in pots and cover lightly with damp soil. Set them in a warm, bright location and wait for the sprouting to begin -- if it hasn't already started during pre-sprouting.

When the sprouts are six to 12 inches long, cut them free and root them in either water or soil. You can plant them straight into the garden soil, if it's the right time of year. The sweet potato is a tropical plant, so the weather and soil must be warm. 

Last year I started planting sweet potatoes in mid-May (I'm in Northeast Kansas), but can wait until late June. These were robust, rooted slips purchased from a local nursery. I also planted slips ordered from Kansas State University research garden. Those slips don't arrive until sometime in the first two weeks of June, and they are not rooted. While they can be directly planted in the garden, I feel better if I root them first. It is best to root them in pots of soil, rather than in a jar of water. If you root them in water, don't crowd them or cover a lot of the stem with water, as that will encourage rotting. I also ordered some slips from a seed company. They arrived late and were in poor shape due to being shipped during the hottest days we had last summer. I put them in a pots of soil and many of them survived.

This is the first time I've tried growing my own slips. I bought organic sweet potatoes from the grocery store because we've eaten all of the white-fleshed sweet potatoes I grew last year. They must be organic, as conventionally raised ones often have been sprayed with something to prevent sprouting. I will still buy some from the nursery and K-State this year, but the ones I got from the grocery store are different varieties. I will keep you posted. 

Once you've planted the slips in the garden, water them regularly until they are well established. I often water the newly planted slips daily, especially since I'm often watering new seed beds daily at that time.  Hot sun can stress the slips and delay their recovery, so I like to shade them a bit by suspending shade cloth over the beds. And I put up temporary fencing because the rabbits and deer find the leaves much to their liking.


Once the slips are well established, you can almost ignore them, except to water in long, dry periods -- and pruning the vines so they don't cover the entire garden. I've rarely had to water mine. However, in really loose, quickly draining soil, they will need regular watering. 

When pruning the vines, go ahead and eat the leaves. The younger ones are tastier and more tender. Cook them or eat them raw. The vines produce a milky sap, but don't let that worry you.

In late September to just before the first frost in October, I will start digging. Don't leave them until after frost or the soil starts to cool a lot, as that will damage your tubers. 

For more information on a sweet potato expert, check out this video from the Douglas County Extension Master Gardeners YouTube channel. It's from the advanced education segment that followed one of our meetings.